Spring Boot is known for being configurable, and that includes actuator endpoints! You can customize and enrich the existing endpoints as well as create completely new ones from scratch! How cool is that? ? It’s simpler than you might expect. Let’s see how it’s done.
Create a /release-notes Endpoint
The overall process is similar to creating an MVC controller method. We will create a class with a specific method, and then an annotated method which will return the actual response content. So create a class called ReleaseNotesEndPoint, then annotate it with @Component and @Endpoint(id="release-notes"). The id is the URL path of the endpoint. Then create a method that returns the actual release notes text. You need to annotate with @ReadOperation.
package com.dailycodebuffer.examples.SpringBootTutorial.config;
import org.springframework.boot.actuate.endpoint.annotation.Endpoint;
import org.springframework.boot.actuate.endpoint.annotation.ReadOperation;
import org.springframework.stereotype.Component;
@Component
@Endpoint(id="release-notes")
public class ReleaseNotesEndpoint {
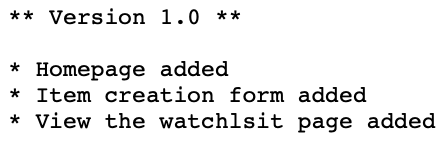
String version10 = "** Version 1.0 ** \n\n"
+ "* Homepage added \n"
+ "* Item creation form added \n"
+ "* View the watchlsit page added \n";
@ReadOperation
public String releaseNotes() {
return version10;
}
}
The endpoint is created but is not exposed yet, so let’s expose it like we did the other standard endpoints:
management.endpoints.web.exposure.include= *,release-notes
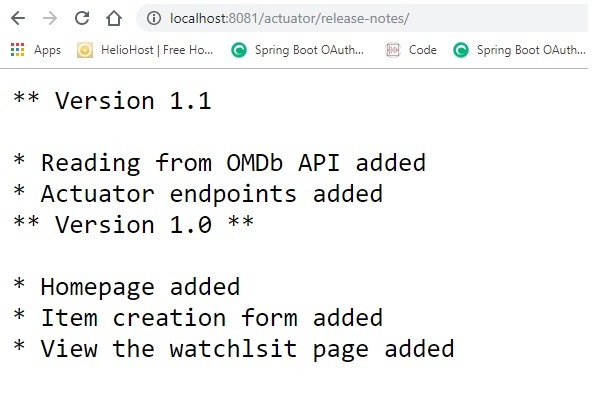
Now go to the http://localhost:8081/actuator/release-notes URL in your browser and see the release notes.
Make /release-notes navigable
We can always return the full history of release notes, but that could get unnecessarily big. So let’s give the user the option of just seeing the release notes of a certain version.
We are going to add another method to our class, which will receive the version as a parameter. Based on that, it will return release notes of that version. The parameter should be annotated with @Selector. Before that, create another class attribute called version11, and add some features to it that we added later to the application.
package com.dailycodebuffer.examples.SpringBootTutorial.config;
import org.springframework.boot.actuate.endpoint.annotation.Endpoint;
import org.springframework.boot.actuate.endpoint.annotation.ReadOperation;
import org.springframework.boot.actuate.endpoint.annotation.Selector;
import org.springframework.stereotype.Component;
@Component
@Endpoint(id="release-notes")
public class ReleaseNotesEndpoint {
String version10 = "** Version 1.0 ** \n\n"
+ "* Homepage added \n"
+ "* Item creation form added \n"
+ "* View the watchlsit page added \n";
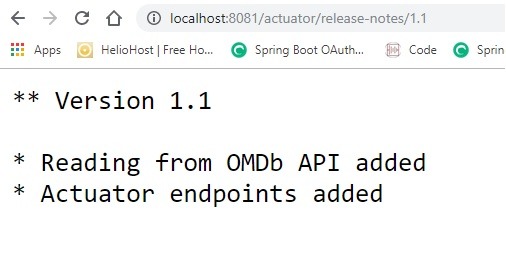
String version11 = "** Version 1.1 \n\n"
+ "* Reading from OMDb API added \n"
+ "* Actuator endpoints added \n";
@ReadOperation
public String releaseNotes() {
return version11 + version10;
}
@ReadOperation
public String selectReleaseNotes(@Selector String selector ) {
if ("1.0".equals(selector)) return version10;
else if ("1.1".equals(selector)) return version11;
else return releaseNotes();
}
}
Now if you go to http://localhost:8081/actuator/release-notes, you see the full release notes.
However, if you go to http://localhost:8081/actuator/release-notes/1.1, you will see the release notes of version 1.1.
You can find the complete source code on Github.
“The craft of programming begins with empathy, not formatting or languages or tools or algorithms or data structures.”
– StatusCOde
Do you want to learn Spring Boot ?
– Daily code buffer


Pingback: Spring Boot Actuator - Complete Guide - Daily Code Buffer